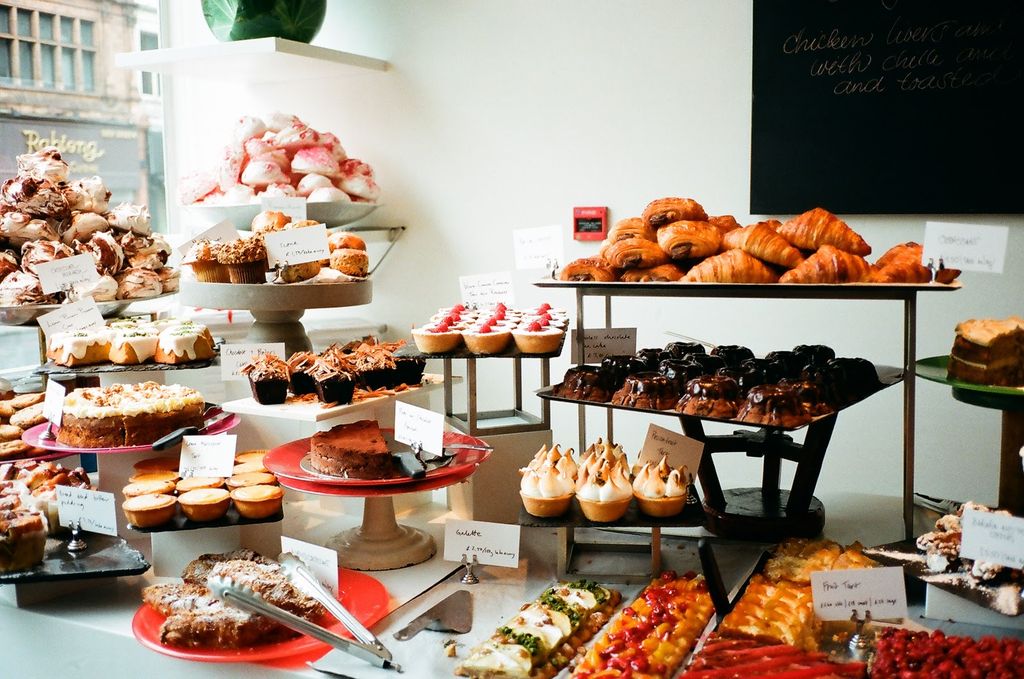
So my eldest sister has been requesting me for the past few months to make this: Ottolenghi's chocolate fudge cake. He has a bakery in the London which I would love to go to. I mean look at the picture...
Let me warn you that this is a chocolate cake not for the faint-hearted. This is a true chocoholic's dream (and I have a chocoholic family).
Ottolenghi's chocolate fudge cake
Serves 8-10
Ingredients
240 g unsalted butter, cut into cubes
265 g dark chocolate (52% cocoa), chopped
95 g dark chocolate (70% cocoa), chopped
290 g light muscovado sugar (I just used light brown sugar) *
4 tbsp water
5 large eggs, separated
Pinch of salt
Cocoa powder for dusting
* I reduced the sugar to about 250 g
Method
1. Preheat oven to 180 C (350 F).
2. Butter a 20 cm (8 inch) springform pan and line bottom & sides with parchment/baking paper.
3. In a large heat proof bowl, combine chopped chocolates & butter and melt.
4. Combine the brown sugar/muscovado sugar with water in a small sauce pan and bring to a boil over medium heat, stirring frequently. Pour the boiling syrup over the chocolate & butter and stir until they have melted.
5. Add the egg yolks, one at a time to chocolate mixture and then set the bowl aside until the mixture comes to room temperature.
6. In a large bowl, using an electric whisk, beat the egg whites & salt to a firm but not dry meringue.
7. Pour 2/3rds of the batter into your prepared pan (about 800 g, saving the remaining batter for later)
8. Bake for 40 minutes or until a skewer inserted comes out clean.
9. Remove the cake from the oven, and leave it on a wire rack to cool completely. Flatten the cake with an offset spatula, don't worry about breaking the surface crust and pour the rest of the batter on top.
10. Level the surface again. Return the cake to the oven and bake for a further 20-25 minutes. When tested with a skewer, the cake should have a few moist crumbs clinging to it.
11. Allow to cool completely in the pan before removing it. Dust with cocoa powder before serving.
Adapted from Ottolenghi's cook book (via Not so humble pie)
 |
| Source: Triptease.com |
There's a lot of chocolate and butter involved. And you bake it twice! I accidentally used a big cake pan because I thought the mixture was going to over-flow, so my cake was rather flat. The texture of this cake is incredibly fudgy with a crackly top, almost like a brownie, but a bit on the lighter side since you have whipped egg whites. It's also not too sweet. Unlike the other flourless chocolate cake I made (using almond meal), it's more rich & dense.
The cake is indeed quite rich, and berries would complement it real well. Or even with ice cream. It's also pretty delicious when warmed in the microwave..Think warm fudgy cake..
But do you know what also goes really well with this? Green tea ice cream. We had a family lunch with my two sisters' boyfriends and my mum made some Malaysian food and I made this cake and green tea ice cream. Combine chocolate & green tea and voila, c'est super!
Ottolenghi's chocolate fudge cake
Serves 8-10
Ingredients
240 g unsalted butter, cut into cubes
265 g dark chocolate (52% cocoa), chopped
95 g dark chocolate (70% cocoa), chopped
290 g light muscovado sugar (I just used light brown sugar) *
4 tbsp water
5 large eggs, separated
Pinch of salt
Cocoa powder for dusting
* I reduced the sugar to about 250 g
Method
1. Preheat oven to 180 C (350 F).
2. Butter a 20 cm (8 inch) springform pan and line bottom & sides with parchment/baking paper.
3. In a large heat proof bowl, combine chopped chocolates & butter and melt.
4. Combine the brown sugar/muscovado sugar with water in a small sauce pan and bring to a boil over medium heat, stirring frequently. Pour the boiling syrup over the chocolate & butter and stir until they have melted.
5. Add the egg yolks, one at a time to chocolate mixture and then set the bowl aside until the mixture comes to room temperature.
6. In a large bowl, using an electric whisk, beat the egg whites & salt to a firm but not dry meringue.
7. Pour 2/3rds of the batter into your prepared pan (about 800 g, saving the remaining batter for later)
8. Bake for 40 minutes or until a skewer inserted comes out clean.
9. Remove the cake from the oven, and leave it on a wire rack to cool completely. Flatten the cake with an offset spatula, don't worry about breaking the surface crust and pour the rest of the batter on top.
10. Level the surface again. Return the cake to the oven and bake for a further 20-25 minutes. When tested with a skewer, the cake should have a few moist crumbs clinging to it.
11. Allow to cool completely in the pan before removing it. Dust with cocoa powder before serving.
Adapted from Ottolenghi's cook book (via Not so humble pie)


